Modern AI Integrations: MCP Server Meets REST API and Local LLMs — Part 3 (MCP Agent Integration)
In the final part of our series, we demonstrate how to build a complete real-world workflow using the MCP Agent to interact with an MCP Server that exposes a RESTful inventory service. If you’ve followed along with Part 1 and Part 2, you now have an MCP-compliant FastAPI app with local LLM inference using tools like Claude Desktop or mcp_cli.
Now it’s time to bring it all together with the mcp-agent, which offers a structured, LLM-ready agent that automatically discovers, registers, and invokes available REST APIs defined via MCP metadata.
What Is MCP Agent?
The MCP Agent project is a programmable agent interface designed to consume services exposed through MCP servers. It supports:
Local or cloud-hosted LLMs (like GPT-4 or Qwen2.5).
Auto-discovery of REST API tools via MCP metadata.
Multi-turn conversations and task chaining.
Easy extensibility for custom workflows.
The agent is perfect for simulating how a human-like assistant might reason through API access patterns.
Understanding MCP Agent Architecture
The MCP Agent operates as a specialized client that:
Maintains persistent connection to the MCP Server
Processes natural language instructions
Can execute predefined workflows
Manages context and state between interactions
The architecture of the framework is designed for modularity, composability, and extensibility, with the following key building blocks:
MCPApp
Acts as the root application. It initializes configuration, logging, and runtime context for the entire agent lifecycle. It’s the main entry point for bootstrapping and running the agent system.Agent
Represents an intelligent autonomous unit capable of using tools from MCP servers, attaching LLMs, and running workflows. An agent manages:LLM integration (OpenAI, Claude, Ollama, etc.)
Tool discovery via registered MCP servers
Multi-turn conversations and memory (if enabled)
Tool
A callable REST API operation defined and served by an MCP server. Tools are automatically discovered and registered using OpenAPI metadata provided by your MCP server.Workflow
Reusable logic steps that LLMs and tools execute as part of a reasoning chain. Workflows help compose advanced tasks, e.g., combining multiple API calls and summarizing results.LLM Wrapper
Standardizes how local or remote LLMs are integrated. For example:OpenAIAugmentedLLMwraps GPT models.You can implement your own wrapper to support Ollama, LLaMA, or other providers.
Prerequisites
Make sure you have:
Docker & Docker Compose installed.
Your FastAPI app MCP Server from Part 1 running.
Redis running as your database.
A virtual environment or container ready to run the MCP Agent in Python.
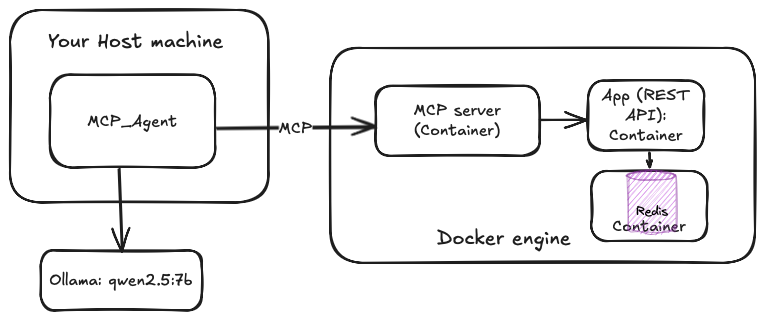
The entire configuration should closely resemble the following illustration:
Step 1. Install required dependencies
Enable your conda environment and install the mcp_agent framework as shown below:
pip install mcp-agentAlso, make sure your docker-compose.yml includes your MCP server (FastAPI app) and Redis instance.
Step 2. MCP Agent Implementation Walkthrough
Here’s the full code for your MCP Agent (also available on GitHub)
import asyncio
import os

from mcp_agent.app import MCPApp
from mcp_agent.agents.agent import Agent
from mcp_agent.workflows.llm.augmented_llm_openai import OpenAIAugmentedLLM
from mcp_agent.workflows.llm.augmented_llm import RequestParams

app = MCPApp(name="Inventory Agent")

async def example_usage():
    async with app.run() as mcp_agent_app:
        logger = mcp_agent_app.logger
        context = mcp_agent_app.context

        model="qwen2.5:14b"
        # This agent will use the invemtory api to communicate with the FastAPI REST application
        inventory_agent = Agent(
            name="inventory",
            instruction="""You can use API to working with orders from the warehouse.
                Return the requested information when asked.""",
            server_names=["fastapi-mcp"], # MCP servers this Agent can use
        )

        async with inventory_agent:
            # Automatically initializes the MCP servers and adds their tools for LLM use
            tools = await inventory_agent.list_tools()
            logger.info(f"Tools available:", data=tools)

            # Attach an OpenAI LLM to the agent (defaults to GPT-4o)
            llm = await inventory_agent.attach_llm(OpenAIAugmentedLLM)

            # invoke fast-api MCP Server
            result = await llm.generate_str(
                message="Let me know all the orders from the warehouse",
                request_params=RequestParams(model=model),
            )
            logger.info(f"Available orders: {result}")

            # Multi-turn interactions by default
            result = await llm.generate_str(
                "Summarize the result in human language",
                request_params=RequestParams(model=model),
                )
            logger.info(f"Result: {result}")

if __name__ == "__main__":
    asyncio.run(example_usage())
How It Works
Let’s break down what this agent does:
Initializes a custom MCP Agent with a defined purpose (inventory).
Registers with the FastAPI-based MCP Server (
fastapi-mcp) and lists its tools.Attaches to a local LLM (e.g., Qwen2.5 ).
Executes LLM prompts that utilize API calls behind the scenes.
Follows up with chained prompts (multi-turn interaction).
Step 3. MCP Agent Configuration
To bring the MCP Agent to life in your project, a YAML configuration file is used to define how the agent runs, which servers it communicates with, and how logs and LLMs are handled. Here's a breakdown of the configuration used in our example (mcp-agent.config.yaml).
$schema: ../../../schema/mcp-agent.config.schema.json

execution_engine: asyncio

logger:
  type: console
  level: debug
  batch_size: 100
  flush_interval: 2
  max_queue_size: 2048
  http_endpoint:
  http_headers:
  http_timeout: 5

mcp:
  servers:
    fastapi-mcp:
      command: "npx"
      args: ["mcp-remote", "http://localhost:8000/mcp"]

openai:
  base_url: "http://localhost:11434/v1"
  api_key: ollama
Here is the key points of the config file:
The entire agent runtime is built on Python's
asyncioto support non-blocking I/O operations — ideal for fast and scalable tool invocations over HTTP.This config sets up a console-based logger in debug mode. It supports batching and async flushing, which helps reduce latency and improve visibility during agent runs. Here, you can change it to level INFO.
The section servers This section registers the MCP Server (running at
http://localhost:8000/mcp) under the namefastapi-mcp. It's invoked using themcp-remoteutility from npx, allowing dynamic tool registration via OpenAPI spec discovery. You can add as much mcp server you want.The LLM backend is configured to use Ollama (running on
localhost:11434) to simulate an OpenAI-compatible API. This allows us to swap in powerful local models like Qwen 2.5 without relying on external cloud-based APIs.
Now, we are ready to run our MCP Agent.
Step 4. Run the Agent.
Execute the following command in the terminal.
uv run main.pyYou should get a lot of debug/info informations into the console.
[INFO] 2025-06-03T17:08:12 mcp_agent.context - Configuring logger with
level: info
[INFO] 2025-06-03T17:08:12 mcp_agent.Inventory Agent - MCPAgent initialized
{
  "data": {
    "progress_action": "Running",
    "target": "Inventory Agent",
    "agent_name": "mcp_application_loop",
    "session_id": "c5dd5517-79e7-4e3c-a6d6-f0398f9e7c0b"
  }
}
[INFO] 2025-06-03T17:08:12 mcp_agent.mcp.mcp_connection_manager -
fastapi-mcp: Up and running with a persistent connection!
[700] Using automatically selected callback port: 16442
[700] [700] Connecting to remote server: http://localhost:8000/mcp
....
[700] [Local→Remote] initialize
[700] {
  "jsonrpc": "2.0",
  "id": 0,
  "method": "initialize",
  "params": {
    "protocolVersion": "2025-03-26",
    "capabilities": {
      "sampling": {},
      "roots": {
        "listChanged": true
      }
    },
    "clientInfo": {
      "name": "mcp (via mcp-remote 0.1.9)",
      "version": "0.1.0"
    }
  }
}
[700] [Remote→Local] 0
[700] [Local→Remote] notifications/initialized
[700] [Local→Remote] tools/list
[700] [Remote→Local] 1
[INFO] 2025-06-03T17:08:13 mcp_agent.Inventory Agent - Tools available:
{
  "data": {
    "meta": null,
    "nextCursor": null,
    "tools": [
      {
        "name": "fastapi-mcp_list_orders_orders_get",
        "description": "List Orders\n\n### Responses:\n\n**200**:
Successful Response (Success Response)\nContent-Type: application/json",
        "inputSchema": {
          "type": "object",
          "properties": {},
          "title": "list_orders_orders_getArguments"
        },
        "annotations": null
      },
      {
        "name": "fastapi-mcp_create_order_orders_post",
        "description": "Create Order\n\n### Responses:\n\n**200**:
Successful Response (Success Response)\nContent-Type: application/json",
        "inputSchema": {
          "type": "object",
          "properties": {
            "customer_name": {
              "type": "string",
              "title": "customer_name"
            },
            "items": {
              "items": {
                "type": "string"
              },
              "type": "array",
              "title": "items"
            }
          },
          "title": "create_order_orders_postArguments",
          "required": [
            "customer_name",
            "items"
          ]
        },
        "annotations": null
      },
      {
        "name": "fastapi-mcp_get_order_orders__order_id__get",
        "description": "Get Order\n\n### Responses:\n\n**200**: Successful
Response (Success Response)\nContent-Type: application/json",
        "inputSchema": {
          "type": "object",
          "properties": {
            "order_id": {
              "type": "integer",
              "title": "order_id"
            }
          },
          "title": "get_order_orders__order_id__getArguments",
          "required": [
            "order_id"
          ]
        },
        "annotations": null
      } ...
[INFO] 2025-06-03T17:14:32 mcp_agent.mcp.mcp_aggregator.inventory -
Requesting tool call
{
  "data": {
    "progress_action": "Calling Tool",
    "tool_name": "list_orders_orders_get",
    "server_name": "fastapi-mcp",
    "agent_name": "inventory"
  }
}
[1455] [Local→Remote] tools/call
[1455] [Remote→Local] 2
[INFO] 2025-06-03T17:14:35 mcp_agent.Inventory Agent - Available orders:
.didReceiveMemoryWarning

Here are the current orders in the warehouse:

1. Order ID: 1, Customer Name: Shamim, Items: Yinhe pro v1, Status: pending
2. Order ID: 2, Customer Name: Mishel, Items: Butterfly Viscary, Status:
pending

[INFO] 2025-06-03T17:14:38 mcp_agent.Inventory Agent - Result: Currently,
there are two orders pending in the warehouse:

- **Order 1**: Ordered by Shamim for "Yinhe pro v1".
- **Order 2**: Ordered by Mishel for "Butterfly Viscary".
Every thing works as expected. You can switch to any LLM through the config file. Let's summarize the benefits of MCP Agent:
Pluggability: Swap in new LLMs or tools without breaking the pipeline.
Discoverability: Tools are automatically listed via MCP metadata.
Security: MCP separates model logic from database operations.
Composable: Easy to build chains or task-specific agents.
A little break ;-)
If you’re interested in building AI-powered applications with local LLMs, check out our book:
📘 Generative AI with Local LLM
Get a practical roadmap with real examples and hands-on lab. Learn how to run your own LLMs, integrate them with tools, and build AI agents that actually work.

With this final part, you now have a fully working pipeline:
REST API that manages inventory orders using Redis.
MCP-compliant FastAPI server that exposes metadata.
LLM-powered agents that can discover and invoke those APIs with natural prompts.
Real-world example of the MCP Agent interacting with your system, all in Python.
This pattern is a solid starting point for internal tools, enterprise assistants, or advanced automation in your AI infrastructure. You’ve now seen MCP in action—modular, secure, and LLM-friendly.
Potential Improvements to the Pipeline
While this end-to-end pipeline successfully demonstrates invoking REST APIs using local LLMs through the MCP Server and Agent, there are several opportunities to improve scalability, reliability, and developer experience:
Better Tool Descriptions & Metadata. Currently, tool descriptions exposed by the MCP Server may be minimal or overly generic. Enhancing these with structured metadata and usage examples can help LLMs reason more effectively about when and how to call a tool.
Persistent Agent Memory. The current agent is stateless between runs. Integrating a memory backend (e.g. Redis or SQLite) could allow agents to recall past interactions or maintain task progress over time, making them more context-aware.
Orchestration with MCP. By leveraging the MCP Agent's ability to discover and reason about tools from multiple MCP Servers, we can build centralized orchestration logic—either declarative (YAML-based plans) or procedural (Python-based workflows).
Security. By default, MCP Servers (such as those built with
fastapi-mcp) expose their metadata and tools without any access control. While this is great for local testing and prototyping, it becomes risky in shared or production environments. However, you can leverage FastAPI’s powerful dependency injection system to add authentication via API Key Headers or by using OAuth2/JWT.