Modern AI Integrations: MCP Server Meets REST API and Local LLMs, Part 1
As AI workflows become more modular and service-driven, integrating local LLMs into existing infrastructure becomes essential. One way to achieve this is through the Model Context Protocol (MCP), which allows services and models to expose structured, discoverable metadata. In this post, we demonstrate how to connect an MCP server with a REST API built using FastAPI and powered by a local language model (LLM).
What is MCP?
MCP (Model Context Protocol) provides a standardized way to describe APIs, services, and models using machine-readable metadata. It’s particularly useful for:
Local AI agent orchestration
Service registries
Interoperability between models and apps
With the fastapi-mcp package, any FastAPI-based REST service can expose itself as an MCP-compliant server.
See me previous posts about MCP protocols with examples to discover more.
Why Local LLMs?
Local LLMs reduce latency, protect privacy, and enable offline usage. Combined with RESTful services and MCP metadata, they provide a flexible deployment pattern for advanced AI workflows.
What Are We Going to Do?
To keep things concise, here’s what we will accomplish in this two-part series:
Part 1: REST API and MCP Integration
Develop an application that exposes a REST API for warehouse order automation.
Store order-related entities using Redis as the database.
Integrate and expose the application as an MCP-compliant server.
Validate MCP endpoints using tools like the MCP Inspector.
Connect the MCP server with agent-based clients such as Claude or Cursor.
Part 2: Local LLM Inference with MCP
Use Ollama to perform local LLM inference.
Connect a local MCP client to the MCP server and orchestrate tasks using a local LLM backend.
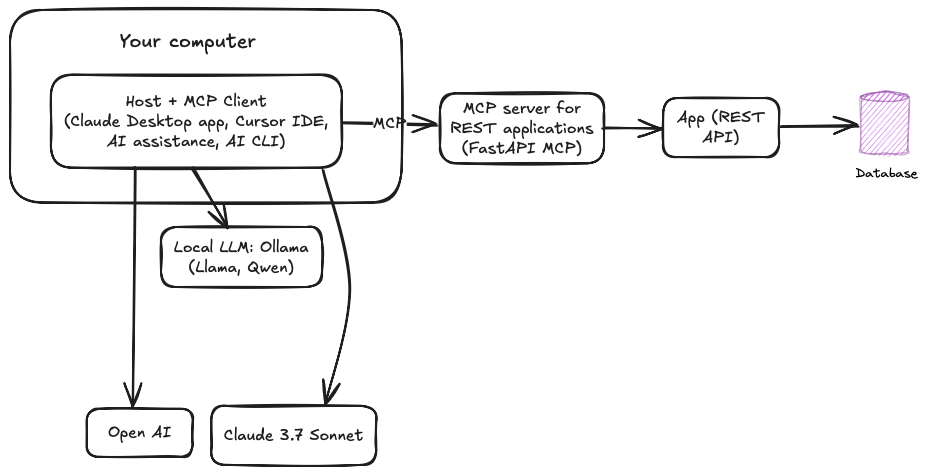
The entire setup should be similar as shown below:
At the moment, the MCP protocol is gaining popularity, and many companies are trying to take advantage of its capabilities. However, I believe it should be used with a clear purpose and in contexts where it truly makes sense.
Let’s begin by exploring the benefits of integrating MCP with an existing REST application, as well as the potential drawbacks when used in less appropriate scenarios.
Benefits of Integrating MCP Server with REST API
Integrating an existing REST API with an MCP server offers several advantages, particularly in modern AI-driven and microservice environments:
Discoverability: MCP enables external tools and agents (including LLMs) to discover your API endpoints and understand their structure without prior knowledge.
Self-documentation: MCP metadata automatically documents services, making them easier to onboard, share, and integrate with other systems.
Interoperability: MCP provides a common interface for orchestrating diverse services, especially in multi-agent or local LLM-based environments.
No vendor lock-in: Because MCP uses standardized metadata, your API can work across multiple platforms and AI agents without modification.
Dynamic invocation: LLMs and automation tools can use MCP metadata to invoke your API intelligently and adaptively.
Let's explore a real world use case.
Use Case: AI-Driven Warehouse Automation
Imagine a local agent powered by a private LLM running on the edge or in an internal environment. The agent can use the MCP metadata of a REST API (like our warehouse order system which we will develop in this post) to:
Query current orders
Auto-update order statuses based on email parsing or inventory checks
Generate summaries of pending shipments
Make decisions (e.g., cancel or expedite) using LLM logic
This approach forms the backbone of smart, AI-enhanced applications without exposing your APIs or data to cloud-based models.
Why Not Integrate MCP Directly with the Database?
Although it might seem simpler to hook MCP directly to the database layer, this is discouraged for a few reasons:
Lack of business logic: Databases don’t encapsulate domain logic (e.g., validation, access control, formatting), which REST APIs often do.
Security risks: Exposing a database directly increases the attack surface and can lead to data leaks or corruption.
Poor interoperability: LLMs and external agents typically reason about actions, not raw data tables. REST APIs offer semantics that align better with AI workflows.
No versioning or abstraction: REST APIs provide a stable interface, whereas raw DB schemas change more frequently and are harder to maintain in distributed settings.
REST APIs serve as the ideal bridge between your data and intelligent clients like LLMs. MCP adds a metadata layer that makes this bridge discoverable and usable by autonomous agents.
Now, let's get started with the example.
Prerequisites
Step 1. Running your Redis instance locally on docker.
docker run --name redis -p 6379:6379 -d redisStep 2. Activate your Conda environment.
conda activate "YOUR Environment"Step 3. Create a new directory in your local file system name "fastapi"
And clone the files from the Github repositories.
There should be two files:
requirements.txt
Step 4. Install the required Python packages.
pip install fastapi uvicorn redis fastapi-mcpAlternatively, you can run the requirements.txt file to install all the necessary libraries.
pip install -r requirements.txtStep 5. Create a new Python file named "main.py" or edit the file you cloned on step 3.
The main.py provides a simple warehouse order management system using Redis as the database..
from fastapi import FastAPI, HTTPException
from pydantic import BaseModel
from typing import List
import redis

from fastapi_mcp import FastApiMCP

# Initialize FastAPI app
app = FastAPI(title="Warehouse Order System")

# Connect to Redis (localhost, port 6379, database 1)
redis_client = redis.StrictRedis(host="127.0.0.1", port=6379, db=1, decode_responses=True)

# Pydantic model for a complete order
class Order(BaseModel):
    order_id: int
    customer_name: str
    items: List[str]
    status: str  # Example statuses: 'pending', 'shipped', 'cancelled'

# Model used for creating new orders
class OrderCreate(BaseModel):
    customer_name: str
    items: List[str]

# Model used for updating existing orders
class OrderUpdate(BaseModel):
    customer_name: str | None = None
    items: List[str] | None = None
    status: str | None = None

# Endpoint to create a new order
@app.post("/orders")
def create_order(order: OrderCreate) -> dict:
    # Generate a new unique order ID
    order_id = redis_client.incr("order_id")

    # Prepare order data to store in Redis
    order_data = {
        "order_id": order_id,
        "customer_name": order.customer_name,
        "items": ",".join(order.items),  # Convert list to comma-separated string
        "status": "pending"  # Default status when order is created
    }

    # Store order hash in Redis
    redis_client.hset(f"order:{order_id}", mapping=order_data)

    # Track all order IDs in a Redis set
    redis_client.sadd("orders", order_id)

    return {"order_id": order_id, "message": "Order created successfully."}

# Endpoint to get a specific order by ID
@app.get("/orders/{order_id}")
def get_order(order_id: int) -> dict:
    # Check if order exists
    if not redis_client.exists(f"order:{order_id}"):
        raise HTTPException(status_code=404, detail="Order not found.")

    # Retrieve order data from Redis
    data = redis_client.hgetall(f"order:{order_id}")
    data["items"] = data["items"].split(",")  # Convert string back to list

    return {"order": data}

# Endpoint to list all orders
@app.get("/orders")
def list_orders() -> dict:
    # Get all order IDs from the Redis set
    order_ids = redis_client.smembers("orders")
    orders = []

    for oid in order_ids:
        data = redis_client.hgetall(f"order:{oid}")
        if data:
            data["items"] = data["items"].split(",")  # Convert string to list
            orders.append(data)

    return {"orders": orders}

# Endpoint to update an existing order
@app.put("/orders/{order_id}")
def update_order(order_id: int, update: OrderUpdate) -> dict:
    # Check if the order exists
    if not redis_client.exists(f"order:{order_id}"):
        raise HTTPException(status_code=404, detail="Order not found.")

    # Update customer name if provided
    if update.customer_name:
        redis_client.hset(f"order:{order_id}", "customer_name", update.customer_name)

    # Update items list if provided
    if update.items:
        redis_client.hset(f"order:{order_id}", "items", ",".join(update.items))

    # Update status if provided
    if update.status:
        redis_client.hset(f"order:{order_id}", "status", update.status)

    return {"message": "Order updated successfully."}

# Endpoint to delete an order by ID
@app.delete("/orders/{order_id}")
def delete_order(order_id: int) -> dict:
    # Check if the order exists
    if not redis_client.exists(f"order:{order_id}"):
        raise HTTPException(status_code=404, detail="Order not found.")

    # Remove order data and ID reference
    redis_client.delete(f"order:{order_id}")
    redis_client.srem("orders", order_id)

    return {"message": "Order deleted successfully."}
The code enables basic CRUD operations on warehouse orders with Redis used as a fast, in-memory store for persistence. Here's a breakdown of the codebase:
Setup and Initialization:
FastAPI()creates the main app instance.redis.StrictRedis()connects to the local Redis server (DB 1).
Data Models:
Order: Full representation of an order withorder_id,customer_name,items, andstatus.OrderCreate: Used when creating a new order (excludesorder_idandstatus).OrderUpdate: Used for partial updates; all fields are optional.
API Endpoints:
POST /orders: Creates a new order.Increments an order ID counter in Redis.
Stores order details as a Redis hash.
Adds order ID to a Redis set for tracking.
GET /orders/{order_id}: Retrieves a single order by ID.Fetches data from Redis and splits
itemsinto a list.
GET /orders: Lists all orders.Iterates over stored order IDs.
Retrieves and formats each order.
PUT /orders/{order_id}: Updates an existing order.Checks for field presence in the request body.
Updates Redis hash fields selectively.
DELETE /orders/{order_id}: Deletes an order by ID.Removes the Redis hash and its ID from the tracking set.
Redis Schema:
order:{id}: Hash storing order details.orders: Set of all active order IDs.order_id: Auto-incrementing counter for generating new order IDs.
A little break for a quick plug 😉
If you're interested in working with AI using local LLMs, don't miss our book Generative AI with Local LLM. It offers a comprehensive roadmap to help you start your AI journey with both theory and hands-on practice.

Step 6. MCP Integration
Attach the MCP server with one line of code:
mcp = FastApiMCP(
    app,
    name="Warehouse MCP",
    description="MCP server for managing warehouse orders."
)

mcp.mount(app)
Step 7. Run the App
python3 -m uvicorn main:app --reloadAfter a while, if everything goes fine, you should get a similar output in your console:
INFO:     Will watch for changes in these directories: ['/Users/shamim/../fastapi']
INFO:     Uvicorn running on http://127.0.0.1:8000 (Press CTRL+C to quit)
INFO:     Started reloader process [42288] using WatchFiles
INFO:     Started server process [42290]
INFO:     Waiting for application startup.
INFO:     Application startup complete.
Now, you have the following resources available in your system:
http://127.0.0.1:8000/docs – Swagger UI
http://127.0.0.1:8000/mcp – MCP metadata
http://127.0.0.1:8000/redoc - API documentation
Step 8. Add some items into the system through Swagger UI http://127.0.0.1:8000/docs
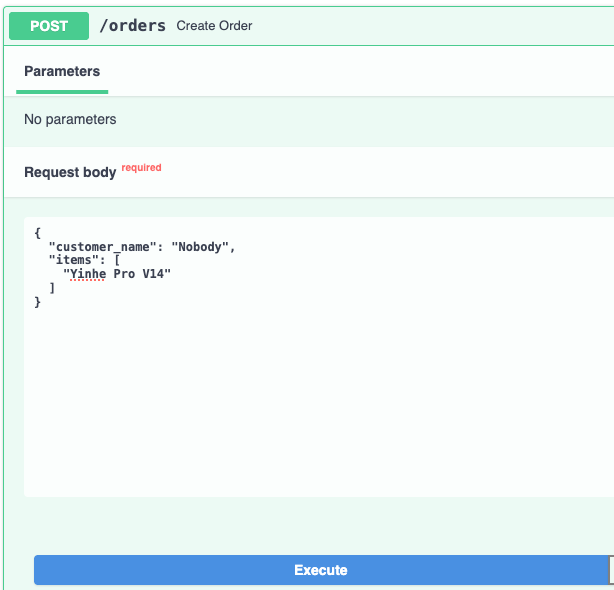
Now, invoke the "/orders" List orders REST API to get the list of all the items you entered into the database.
curl -X 'GET' \
  'http://127.0.0.1:8000/orders' \
  -H 'accept: application/json'
It should return something like as shown below (I have entered 4 items):
{
  "orders": [
    {
      "order_id": "3",
      "customer_name": "Timur",
      "items": [
        "Butterfly Timoball"
      ],
      "status": "delivered"
    },
    {
      "order_id": "2",
      "customer_name": "Mishel",
      "items": [
        "Yinhe Pro V1"
      ],
      "status": "pending"
    },
    {
      "order_id": "4",
      "customer_name": "Nobody",
      "items": [
        "Yinhe Pro V14"
      ],
      "status": "pending"
    },
    {
      "order_id": "1",
      "customer_name": "Shamim",
      "items": [
        "Butterfly Viscari"
      ],
      "status": "pending"
    }
  ]
}
The application works fine. Now let's check it's MCP protocol.
Step 9. Use MCP Inspector to test the MCP server (Optional).
The MCP inspector is a developer tool for testing and debugging MCP servers. It's an opensource project which is very helpful to test the functionalities of the MCP server before connecting to any MCP Client.
You don't need to clone of install any source code. Just Install NodeJS and run the following command:
npx @modelcontextprotocol/inspectorIt will be available by the address http://127.0.0.1:6274. Note that, the MCP Inspector is not working well on MacOS Safari browser, use Google chrome or some other browser to use it.
So, select the following parameters:
Transport type: SSE
URL: http://localhost:8000/mcp (or your URL to the MCP Server)
and hit the button "Connect".
After successfully connected to the MCP server, click on the "List tools" button on page "tools" as show below:
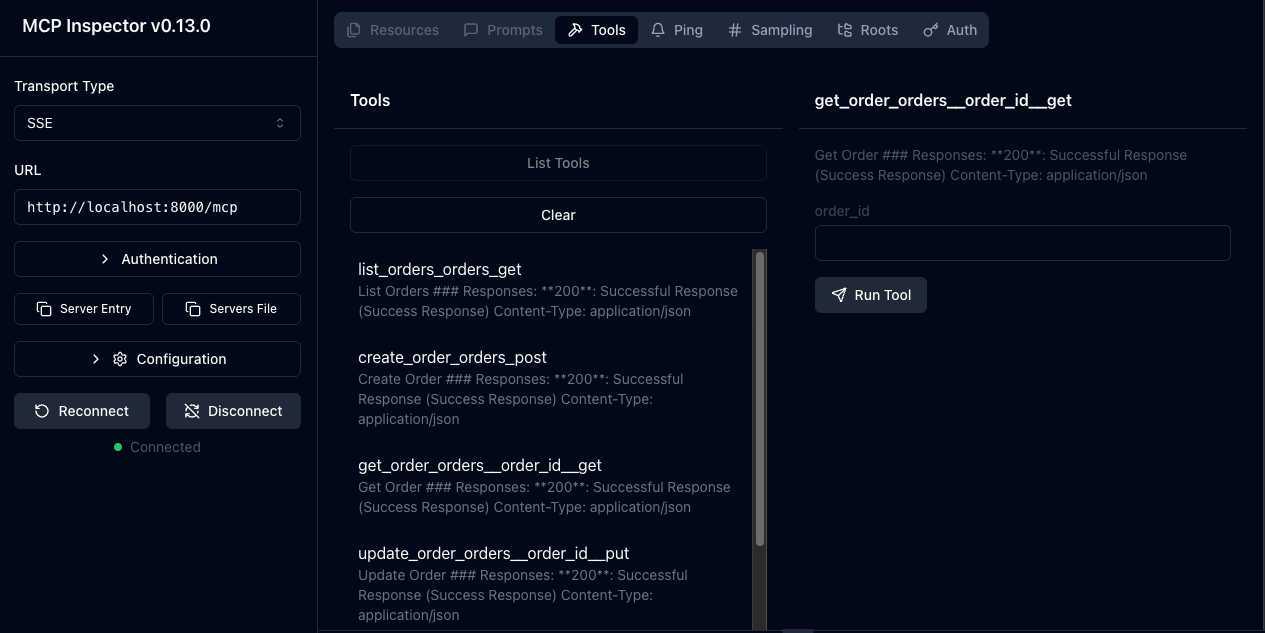
Choose any tool such as "list_orders_orders_get" and click "Run tool". It will invoke the REST API endpoint list all orders "/orders" and return the result.
Play around the Inspector with other endpoints. You can also add other functionalities in the FastAPI application like Authentification and test through the MCP inspector.
For now, every thing is up and running, so let's connect our MCP server with any MCP Client.
Here we have a few options:
Claude desktop (pre install with LLM like sonnet)
Cursor IDE (can choose a variati of LLM)
mcp-cli with Local LLM (which we will cover on the next part of the article).
Let's try Claude desktop, it's easy and straight foreword.
Step 10. Download and install Claude desktop.
Download and install the app from this link. Start the Claude desktop.
Step 11. Configure our MCP Server.
Go to the Claude setting->Developer->Edit Config.
It will open a file named "claude_desktop_config.json". Add the following configuration in to the file and restart the Claude Desktop (Close & Open again).
{
    "mcpServers": {
      "fastapi-mcp": {
        "command": "npx",
        "args": [
          "mcp-remote",
          "http://localhost:8000/mcp"
          ]
      }
    }
  }
After that, you should see the tools on Claude search and tools option settings as shown below:

Here, fastapi-mcp is our MCP server tools that exposed by the REST API. Lets try some prompts to work with the tools defined by the MCP Server.
Prompt 1. Show me all the orders
Result:
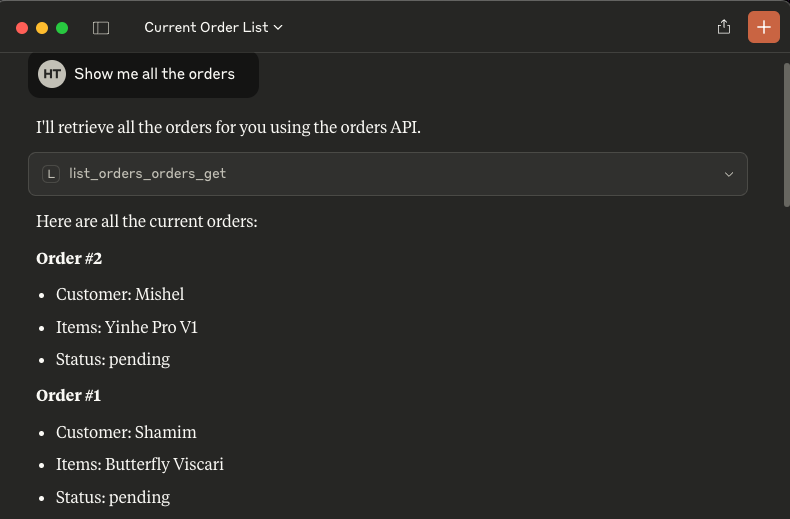
For the first time, Claude will ask your permission to invoke the external tools.
Prompt 2. Place a new order, customer: Timur, items: Butterfly timoball, status: delivered
Result:

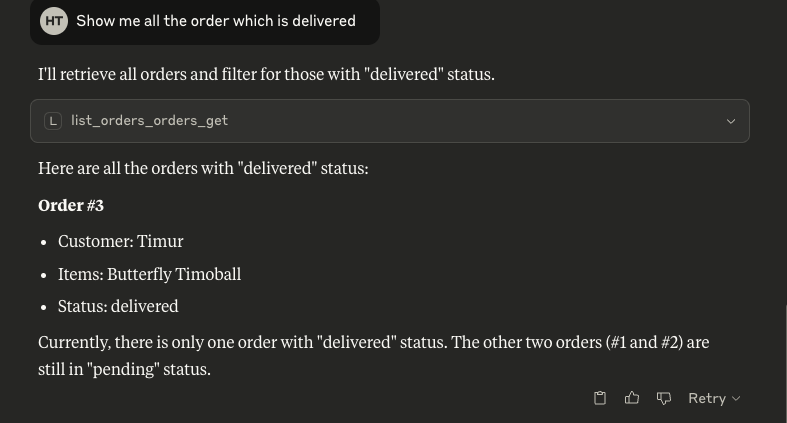
Prompt 3. Show me all the order which is delivered
Result:
That's all for today.
In this article, we explored how to integrate a RESTful application with the Model Context Protocol (MCP) using FastAPI, backed by Redis for data storage. We also introduced the benefits of combining local LLMs with MCP to create modular and efficient AI-powered systems. By exposing your existing REST API as an MCP server, you enable dynamic discovery and orchestration by AI agents such as Claude or Cursor. This architecture enhances flexibility and control, especially for privacy-sensitive or offline-first applications.
In the next part of this series, we’ll go deeper into connecting local LLMs using tools like Ollama and demonstrate how to consume MCP metadata to generate dynamic prompts and workflows. Stay tuned!