Modern AI Integrations: MCP Server Meets REST API and Local LLMs, Part 2
In Part 1, we built a FastAPI-based application to manage warehouse orders and exposed it as an MCP server. We demonstrated how the Model Context Protocol (MCP) can be used to describe APIs in a structured way and make them discoverable to AI agents or MCP client. Now, in Part 2, we’ll connect this MCP server and a local Large Language Model (LLM) to invoke the REST API through natural language commands.
Recap: Why Use MCP with Local LLMs?
The MCP protocol makes RESTful APIs discoverable and machine-interpretable. When paired with local LLMs, we can enable smart automation and workflows without relying on external cloud services. This means better control, privacy, and lower latency.
What We’ll Cover
In this post, we’ll:
Set up a local LLM using Ollama for inference.
Connect the local LLM to understand and interact with the REST API via MCP Client.
Test natural language prompts that invoke real API endpoints and returns results.
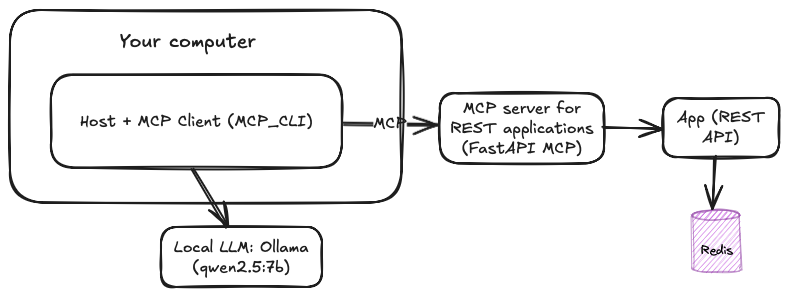
The entire setup will very similar as shown below.
Requirements:
Local LLM with Ollama: Llama, qwen2.5:7b
MCP_CLI: MCP client that can works with local LLM
Node.js (if you need to run MCP servers through NPX)
Python >= 3.8
For those, who don't familiar with MCP_CLI project. MCP_CLI is a lightweight command-line application for connecting to MCP servers. It supports local LLMs through Ollama and OpenAI and is written in pure Python. The mcp-cli project also supports all MCP servers provided by the community, regardless of whether they run on Docker or UVX executions. Let's get started.
Step 1. Clone the repository.
git clone https://github.com/chrishayuk/mcp-cli
cd mcp-cli
Step 2. Install UV which will be used to run the MCP servers.
pip install uv
uv sync --reinstall
The project provides two different modes: Chat and Interactive. I will go through the chat mode.
After cloning the project, open the server_config.json file in text editor.
{
  "mcpServers": {
    "sqlite": {
      "command": "uvx",
      "args": ["mcp-server-sqlite", "--db-path", "test.db"]
    },
    "filesystem": {
      "command": "npx",
      "args": [
        "-y",
        "@modelcontextprotocol/server-filesystem",
        "/Users/christopherhay/chris-source/chuk-test-code/fibonacci"
      ]
    }
  }
}
Here, two MCP servers are already provided: SQLite and Filesystem.
MCP Server "sqlite": This will run through UVX and doesn’t require any extra configuration.
MCP Server "filesystem": This will run through
npx(Node.js package execution). You need to replace/Users/christopherhay/chris-source/chuk-test-code/fibonacciwith your local filesystem directory, which will be made available through the tool.
Add our "fastapi-mcp" server configuration into the server_config.json file as shown below:
{
    "mcpServers": {
      "fastapi-mcp": {
        "command": "npx",
        "args": [
          "mcp-remote",
          "http://localhost:8000/mcp"
          ]
      }
    }
  }
Step 3. Run your Ollama inference.
ollama run qwen2.5:7bHere, carefully choose your LLM which supports tools functions, otherwise you will get error like "Error during conversation processing: Ollama API Error: registry.ollama.ai/library/gemma3:12b does not support tools"
Step 4. Start the mcp-cli on chat mode.
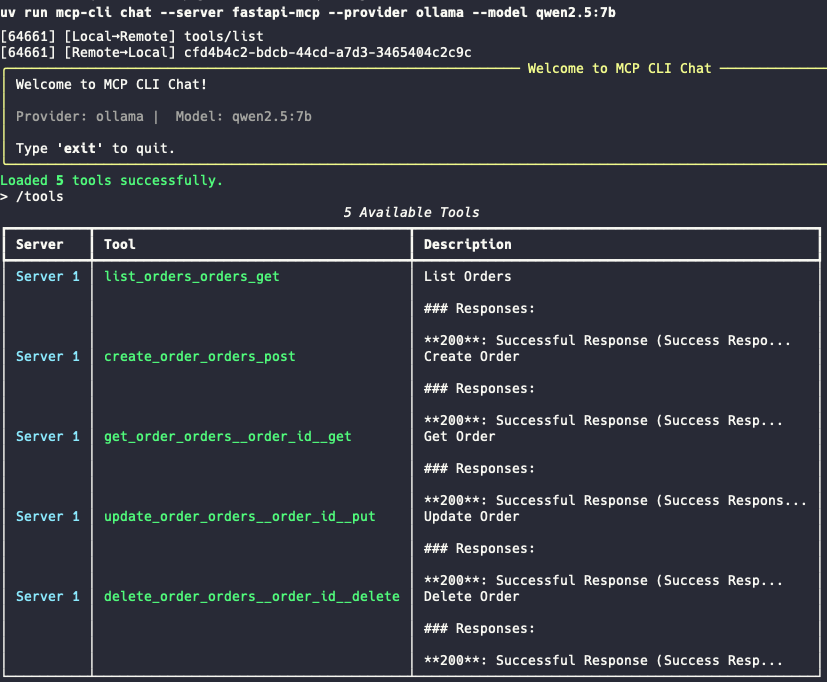
uv run mcp-cli chat --server fastapi-mcp --provider ollama --model qwen2.5:7bEnter the command /tools, and you should see a list of available tools from the fastapi-mcp MCP server.
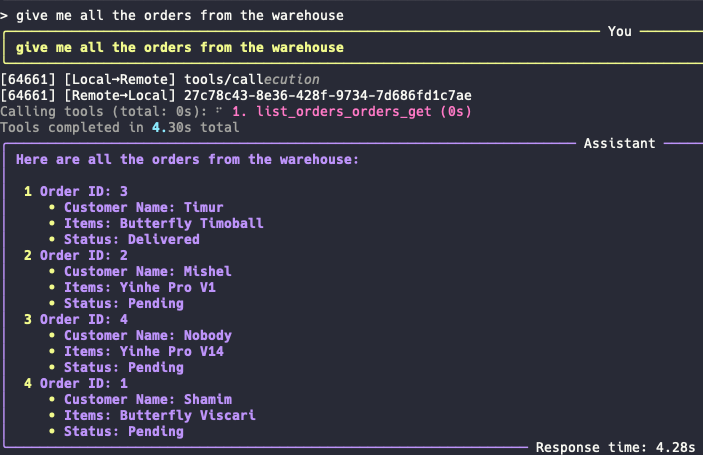
Let's try a few prompts:
Prompt 1 : "give me all the orders from the warehouse"
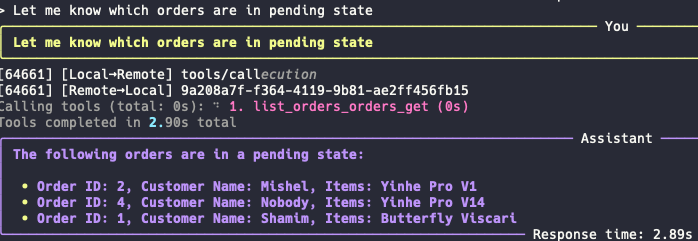
Prompt 2 : "Let me know which orders are in pending state"
Prompt 3: "Delete the order with Customer name Nobody"

Working like a charms!!
Why This Works
Thanks to the MCP metadata, the LLM doesn’t need hardcoded logic or training data about your API. It simply interprets the MCP description and generates valid REST calls.
This setup is powerful for:
Personal AI agents that automate tasks.
Offline assistant tools like Cursor or local ChatGPT alternatives.
Secure enterprise apps that can’t expose data to external APIs.
Use Case Example: Local Warehouse Agent
Imagine a logistics assistant running locally:
You describe an intent: “Cancel all pending orders from customer Bob.”
The agent queries the MCP server for
/orders, filters forcustomer_name == Bobandstatus == pending, and sendsDELETErequests.All of this happens without writing custom logic — driven by the LLM and MCP metadata.
By combining the power of the MCP protocol with local LLMs like LLaMA or Qwen, you can create powerful, flexible, and private AI integrations. These agents can understand your APIs and act on your data without hardcoding workflows or exposing anything to the cloud.
Deploying the MCP server with Redis Using Docker Compose
To simplify the deployment of both your MCP server and the Redis database, you can use Docker Compose. This tool allows you to define and run multi-container applications with just a single command.
Project Structure
Make sure your project directory has the following structure:
fastapi/
├── app.py                 # Your FastAPI MCP server app
├── requirements.txt       # Python dependencies
├── Dockerfile             # For building the app image
└── docker-compose.yml     # For managing multi-container deployment
Please check the GitHub repository for the pre-defined files. I made slight modifications to the main.py file and renamed it to app.py to connect to the Redis server running on the same Docker engine.
import os
import redis

redis_host = os.getenv("REDIS_HOST", "127.0.0.1")
redis_port = int(os.getenv("REDIS_PORT", 6379))

redis_client = redis.StrictRedis(host=redis_host, port=redis_port, db=1, decode_responses=True)
Step 1: Create the Dockerfile
This file tells Docker how to build your FastAPI app container:
# Dockerfile
FROM python:3.11-slim

WORKDIR /app

COPY requirements.txt .
RUN pip install --no-cache-dir -r requirements.txt

COPY . .

CMD ["uvicorn", "app:app", "--host", "0.0.0.0", "--port", "8000"]
Step 2: Define Services in docker-compose.yml
Create a docker-compose.yml file to define two services: fastapi-app and redis:
version: "3.9"

services:
  redis:
    image: redis:7
    container_name: redis
    ports:
      - "6379:6379"

  fastapi-app:
    build: .
    container_name: fastapi-orders-app
    ports:
      - "8000:8000"
    environment:
      REDIS_HOST: redis
      REDIS_PORT: 6379
    depends_on:
      - redis
This setup ensures:
Redis runs in its own container.
The FastAPI app can communicate with Redis using the hostname
redis.
Step 3: Build and Run the App
Now you’re ready to launch everything with one command:
docker-compose up --buildYou should see logs from both Redis and your FastAPI app in the terminal.
Step 4: Access the App
Once running, you can access the FastAPI app at:
http://localhost:8000
http://localhost:8000/docs # Swagger UI
http://localhost:8000/mcp #MCP
In this post, we walk through integrating the Model Context Protocol (MCP) server with REST APIs and locally run LLMs (like LLaMA), testing the setup with an MCL client (MCP_CLI). Finally, we automate the deployment process using Docker Compose, simplifying the entire application workflow.
If you’re interested in building AI-powered applications with local LLMs, check out our book:
📘 Generative AI with Local LLM
Get a practical roadmap with real examples and hands-on lab. Learn how to run your own LLMs, integrate them with tools, and build AI agents that actually work.