Model Context Protocol (MCP): Bridging LLMs with Distributed Databases like Apache Ignite
In my previous post, I provided an overview of the Model Context Protocol (MCP) and its integration with local LLMs. I also introduced the mcp-cli application, which allows local LLMs to interact with various resources. As interest in MCP grows, developers are actively building new MCP servers for different tasks. You can find a complete list of available MCP servers online.
Despite the variety of MCP servers designed for different databases, I couldn’t find one specifically for working with distributed databases like Apache Ignite or Cassandra. While Apache Cassandra lacks native JDBC support—making integration less straightforward—Apache Ignite, as an in-memory distributed database, does support JDBC connectivity.
With this in mind, I decided to experiment with modifying an existing MCP server to connect to Apache Ignite and run queries against it. In this blog post, I'll walk you through my journey, sharing insights and solutions that could save you time in your own implementations.
Before we begin, here’s a brief overview of Apache Ignite.
Apache Ignite is a distributed NoSQL database that can scale seamlessly across both memory and disk. Despite its capabilities, it remains relatively underrated. However, with the release of Version 3.0, Apache Ignite has undergone a complete architectural redesign, making it more compatible with databases like Cassandra and Redis. For a deeper dive into its core improvements, refer to the official documentation.
For testing purposes, I’ll be using Apache Ignite 3, which supports JDBC connectivity, making it a suitable choice for integration with MCP.
What We'll Do in This Blog Post:
Start a local Apache Ignite server.
Create a few tables or entities.
Insert sample data into the tables.
Modify an existing MCP server to connect to the Ignite database.
Run SQL queries using natural language through MCP_CLI.
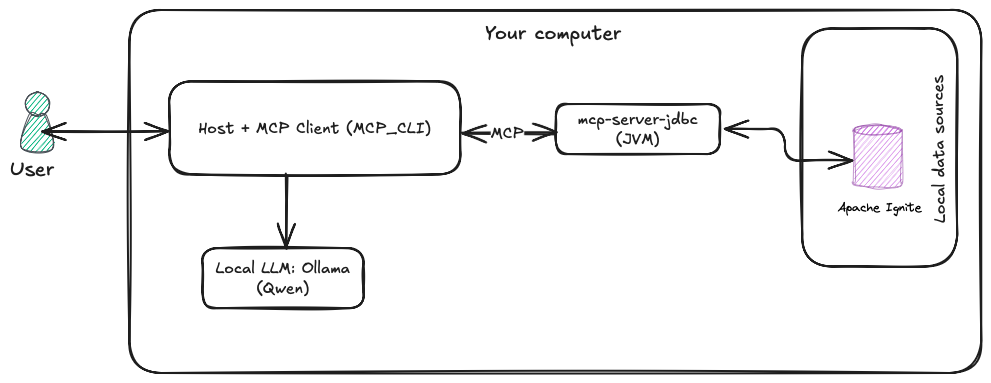
By following these steps, we'll explore how to integrate MCP with Apache Ignite and leverage its capabilities for seamless database interactions. We will also use MCP Inspector for testing and debugging the MCP server. Our setup will resemble the following illustration, showcasing how MCP interacts with Apache Ignite for querying and data processing.
Step 1. First thing first, start an Ignite server.
Download the Apache Ignite distribution from the official website and extract it. Then, navigate to the ignite3-db-3.0.0 directory and execute the following script to start the Ignite server:
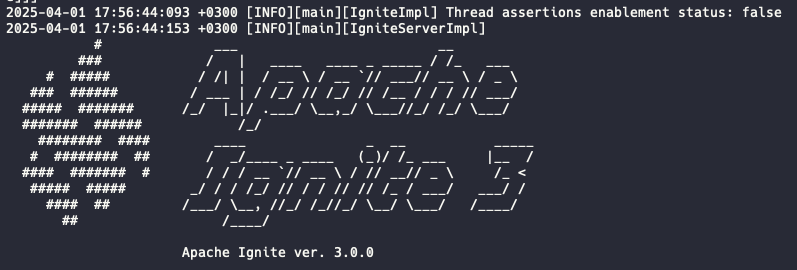
bin/ignite3dbIt will start an Ignite local database node as shown below:
Step 2. Start the Ignite CLI to interact with the database using the following command:
To start the Ignite CLI, navigate to the ignite3-cli-3.0.0 directory. Run the following command:
bin/ignite3To initialize the Apache Ignite cluster, run the following command in the Ignite CLI:
cluster init --name=sampleClusterNow, you can create tables in the database. To enter REPL mode (Read-Eval-Print Loop) for interactive SQL execution, run the following command in the Ignite CLI:
sqlStep 3. Create a table.
Use the CREATE TABLE statement to create a new table:
CREATE TABLE IF NOT EXISTS DEPARTMENT (DEPARTMENT_NO int primary key, DEPARTMENT_NAME varchar, DEPARTMENT_LOC varchar);Insert a few rows:
insert into DEPARTMENT (DEPARTMENT_NO, DEPARTMENT_NAME, DEPARTMENT_LOC) values(1, 'Marketing', 'Berlin');
insert into DEPARTMENT (DEPARTMENT_NO, DEPARTMENT_NAME, DEPARTMENT_LOC) values(2, 'Warehouse', 'Bon');
insert into DEPARTMENT (DEPARTMENT_NO, DEPARTMENT_NAME, DEPARTMENT_LOC) values(3, 'Sales', 'Amsterdam');
insert into DEPARTMENT (DEPARTMENT_NO, DEPARTMENT_NAME, DEPARTMENT_LOC) values(4, 'Headquater', 'Afina');

insert into DEPARTMENT (DEPARTMENT_NO, DEPARTMENT_NAME, DEPARTMENT_LOC) values(5, 'Sales', 'Lisbone');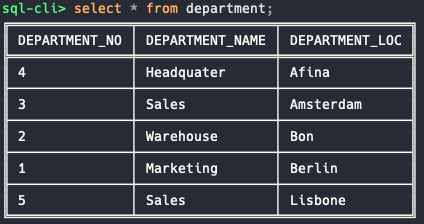
Now that our database is configured and ready to use, let's move on to the next step: modifying an existing MCP server to connect with Apache Ignite and execute queries.
Step 4. Modify an existing JDBC MCP server.
There are several MCP servers available that support native JDBC connectivity. However, I chose mcp-server-jdbc, which is built with Quarkus and can connect to any JDBC-compatible database, including PostgreSQL, Oracle, and more.
To get started, clone the project from the GitHub repository:
git clone https://github.com/quarkiverse/quarkus-mcp-servers.gitNavigate to the jdbc directory and edit the pom.xml file. Add the following dependencies to enable Apache Ignite support:
        <dependency>
            <groupId>org.apache.ignite</groupId>
            <artifactId>ignite-jdbc</artifactId>
            <version>3.0.0</version>
        </dependency>
        <dependency>
            <groupId>org.apache.ignite</groupId>
            <artifactId>ignite-core</artifactId>
            <version>3.0.0</version>
        </dependency>
        <dependency>
            <groupId>org.apache.ignite</groupId>
            <artifactId>ignite-client</artifactId>
            <version>3.0.0</version>
        </dependency>
Edit the jdbc/.scripts/mcpjdbc.java file to include the Apache Ignite JDBC driver in the MCP server.
Locate the setupDrivers() function and modify it as follows:
drivers.put("ignite", List.of("org.apache.ignite:ignite-jdbc:3.0.0"));Modify the setDriverClasses() function in the jdbc/.scripts/mcpjdbc.java file to include the Apache Ignite JDBC driver:
drivers.put("ignite", "org.apache.ignite.jdbc.IgniteJdbcDriver");Now, build the project with the following command:
mvn clean installThe MCP server executable JAR file (mcp-server-jdbc-999-SNAPSHOT.jar) will be located in the target directory after a successful build.
Step 5. Test the MCP server with the MCP Inspector.
Run the MCP inspector tool by the following command
npx @modelcontextprotocol/inspectorRunning the MCP server will start a local web server on http://localhost:5173/#tools, where you can test your MCP server and interact with it.
Note that, we have two option to run the JDBC MCP server which we build: Jbang and java.
Jbang is a new project which can create, edit and run self-contained source-only or binary Java programs with unprecedented ease.
Let's try using Jbang to run the MCP Server. On the MCP Inspector page, fill in the following setup:
Command: jbang
Argument: /YOUR_PATH/quarkus-mcp-servers/jdbc/target/mcp-server-jdbc-999-SNAPSHOT.jar
And click the CONNECT button. If everything goes smoothly, you should see output from the MCP server:
__ ____ __ _____ ___ __ ____ ______ --/ __ \/ / / / _ | / _ \/ //_/ / / / __/ -/ /_/ / /_/ / __ |/ , _/ ,< / /_/ /\ \ --\___\_\____/_/ |_/_/|_/_/|_|\____/___/ 2025-04-01 11:59:47,735 INFO [io.quarkus] (main) mcp-server-jdbc 999-SNAPSHOT on JVM (powered by Quarkus 3.19.2) started in 0.313s. Listening on:
2025-04-01 11:59:47,737 INFO [io.quarkus] (main) Profile prod activated. 2025-04-01 11:59:47,737 INFO [io.quarkus] (main) Installed features: [cdi, mcp-server-sse, mcp-server-stdio, qute, smallrye-context-propagation, vertx]
Navigate to the Tools menu and select a tool, such as database_info. Click the Run Tool button. You should see the tool's result as follows:
{"database_product_name":"Apache Ignite","driver_name":"Apache Ignite JDBC Driver","max_connections":"0","database_product_version":"ProtocolVersion [major=3, minor=0, patch=0]","sql_keywords":"","read_only":"false","driver_version":"ProtocolVersion [major=3, minor=0, patch=0]","supports_transactions":"false"}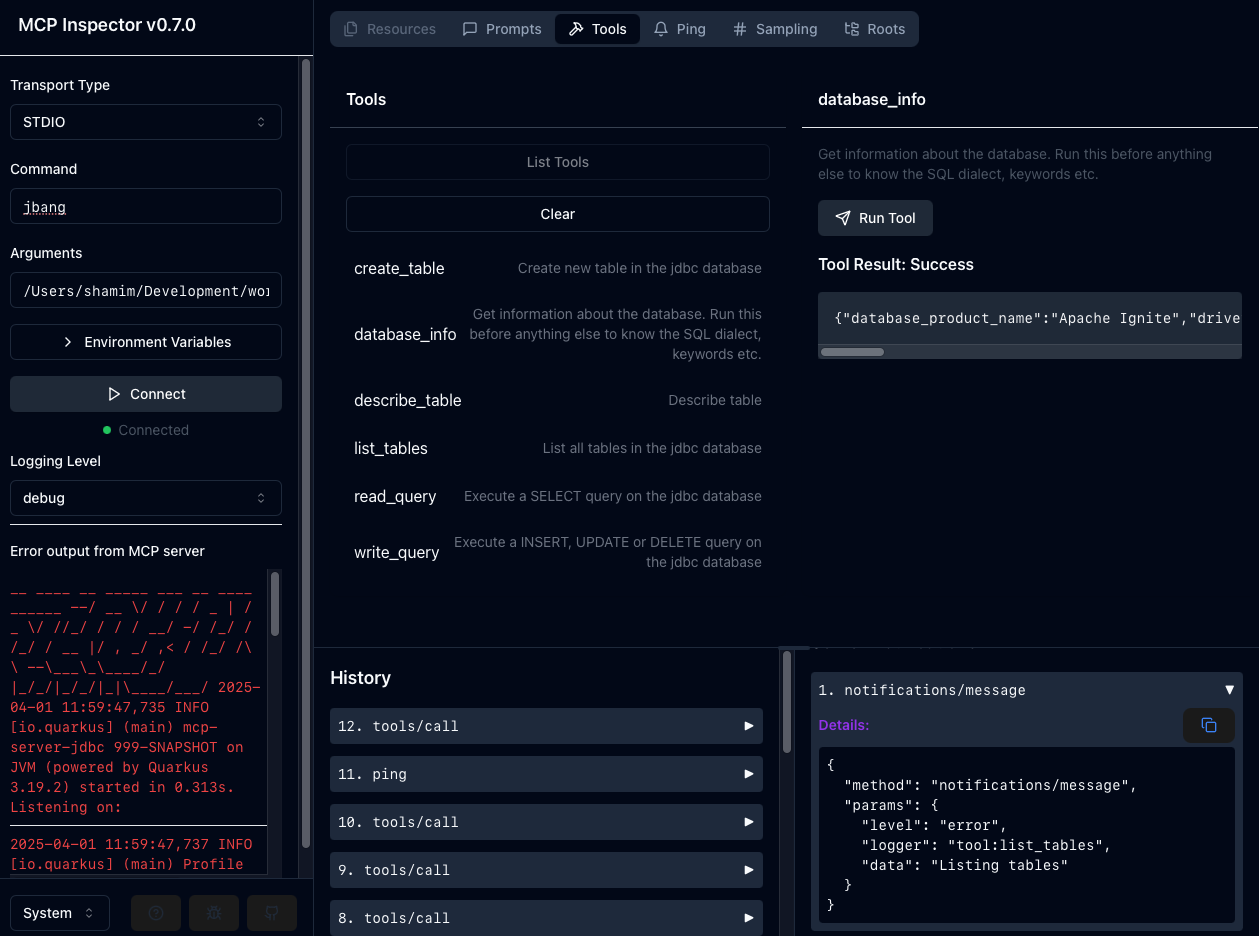
Feel free to explore the tools. The GUI is user-friendly and intuitive. If the tool returns a 'success' message, it means we are ready to use MCP_CLI and our LLM to execute queries via natural language processing (NLP).
Step 6. Run your Ollama inference.
ollama run qwen2.5:7bStep 7. Add the JDBC MCP Server configuration to the MCP_CLI application.
Open the server_config.json file of MCP_CLI application in the text editor and add the following configuration:
    "jdbc": {
        "command": "jbang",
        "args": [
            "/YOUR_PATH/quarkus-mcp-servers/jdbc/target/mcp-server-jdbc-999-SNAPSHOT.jar",
            "jdbc:ignite:thin://localhost:10800"
        ]
    }
Start the mcp-cli on chat mode.
uv run mcp-cli chat --server filesystem --provider ollama --model qwen2.5:7bIf you're struggling with the mcp_cli application, please refer to the previous blog post or read the sample chapter from our book Generative AI with Local LLM.
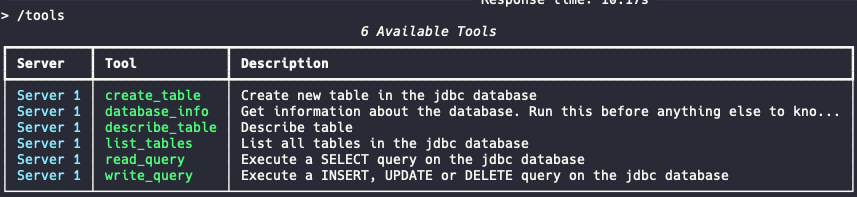
Enter the command /tools, and you should see a list of available tools from the JDBC MCP server.
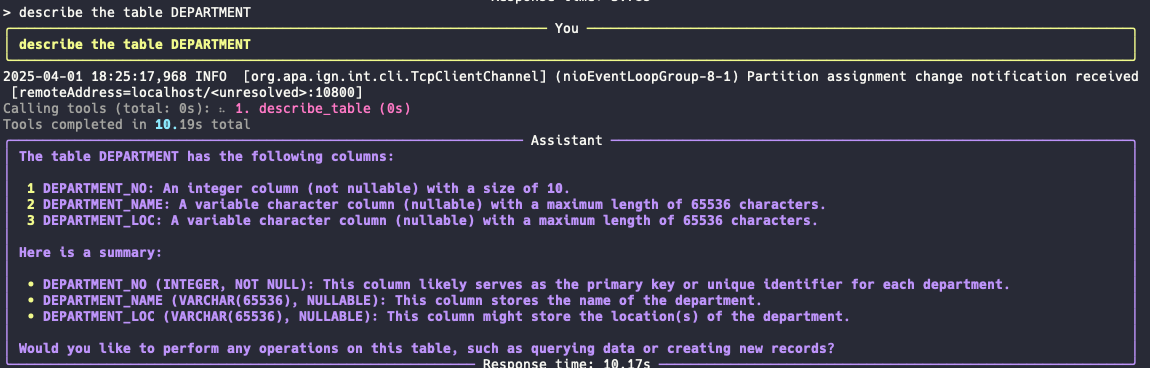
Enter any command like "describe the table DEPARTMENT".
Let's ask some questions on natural language as shown below:
where is the sales departments located? It should return the following result:
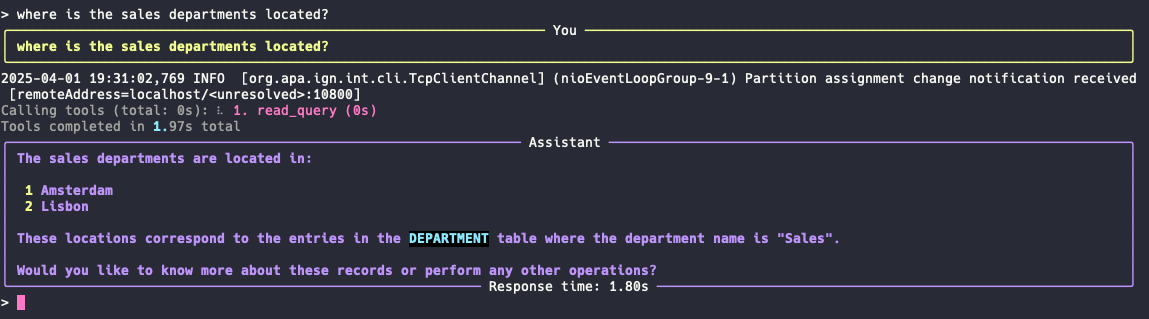
The result is correct and the response time is 1.8 s.
Let's try one more query as shown below:
In city Lisbone which department is based? 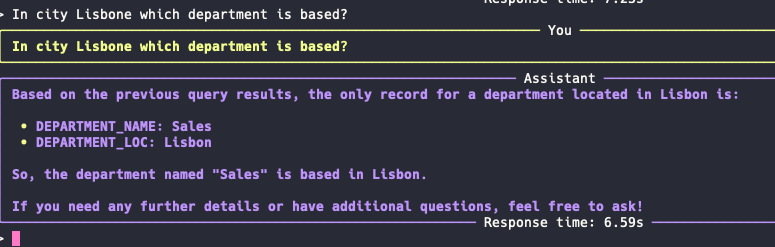
Result: So, the department named "Sales" is based in Lisbon.
Here, the LLM converts natural language into SQL queries and sends them to Ignite through the MCP Server. This represents another effective method of text-to-SQL generation based on the database structure. The results from the Ignite database are then translated back into human-readable language by the LLM for the end user.
As we continue to enhance these systems, they will become increasingly proficient at translating complex user queries into accurate and efficient SQL code.
If you enjoy reading the blog and find my content helpful or inspiring, consider buying me a coffee on Ko-fi. Your support helps me keep creating, writing, and sharing valuable content for free. Every little bit means a lot — thank you! 💙