OpenAI Agents SDK with local LLM
The OpenAI Agents SDK is a Python-based framework designed for building production-ready AI agent applications. It provides a streamlined approach to creating agentic systems where multiple AI agents collaborate through task delegation and tool usage.
Core Components:
Agent Loop: Manages iterative task execution with integrated tool usage and result processing.
Handoff System: Enables dynamic task delegation between specialized agents using triaging logic.
Guardrails: Implements parallel validation pipelines for input sanitization and output safety checks.
Tracing: Built-in observability with execution flow visualization and performance monitoring.
And The Large Language Model (LLM) is the core intelligence behind the OpenAI Agents SDK workflow. It powers the agent's decision-making, natural language understanding, and reasoning abilities.Before diving into the technical details, let's explore its benefits and how it differs from other existing agentic frameworks.
Benefits
Production Readiness
Simplified upgrade path from experimental Swarm framework
Built-in rate limiting and error handling
Enterprise-grade security controls for LLM interactions
Developer Experience
83% reduction in boilerplate code compared to vanilla implementations
Integrated debugging through execution tracing dashboard
Python-native implementation using modern type hints
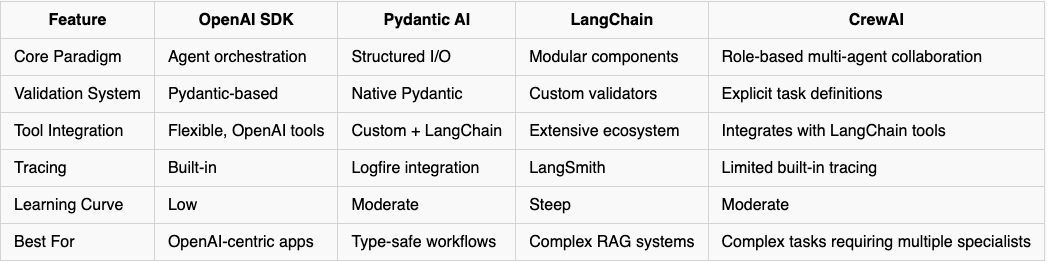
Framework Comparison
There are many agentic frameworks available today. Let's take a quick look at how this protocol compares with other popular frameworks
For those like me encountering the term "Pydantic-based validation" for the first time:
Pydantic validation is the process of ensuring that input data matches the expected structure, types, and constraints by using Pydantic models. It automates type-checking and data parsing, raising errors when data is invalid.As a CrewAI user, I was eager to explore the OpenAI Agents SDK and compare it with CrewAI. The OpenAI Agents SDK offers a low learning curve for agent orchestration, which inspired me to document my experiments in this blog post.
Additionally, I often use local LLMs on my homelab server, making it particularly interesting to integrate the OpenAI Agents SDK with my local LLM. In this post, I will use Ollama for local LLM inference and compare the OpenAI Agents SDK with CrewAI.
Workflow
As I mentioned before that, the LLM is the core intelligence behind the OpenAI Agents SDK workflow. It powers the agent's decision-making, natural language understanding, and reasoning abilities. Here’s how it fits into each stage of the workflow:
Input Interpretation. The process starts when the agent receives an input. This could be a user query, a task to perform, or data from external sources.
Decision-Making (Agent Logic). The LLM decides whether the agent should process the request internally or invoke external tools. It reasons through complex prompts and selects the best approach.
Tool Invocation. When the agent receives input, it decides whether it needs external tools (e.g., web search, database queries) to fulfill the request. It calls the relevant tool and processes the output.
Reasoning and Iteration (Agent Loop). The agent loop is powered by the LLM. It enables the agent to:
Reflect on intermediate outputs.
Determine if further actions are needed.
Continue processing until a valid response is generated.
Task Delegation (Handoff Mechanism). It delegates tasks to specialized sub-agents. This is useful for breaking down complex workflows.
Validation and Guardrails. Guardrails ensure that inputs and outputs meet specific validation and safety standards. They prevent the agent from executing unsafe or invalid actions.
Response Generation. Finally, the LLM synthesizes all gathered information into a coherent, human-readable response.
The next image illustrates the entire workflow.
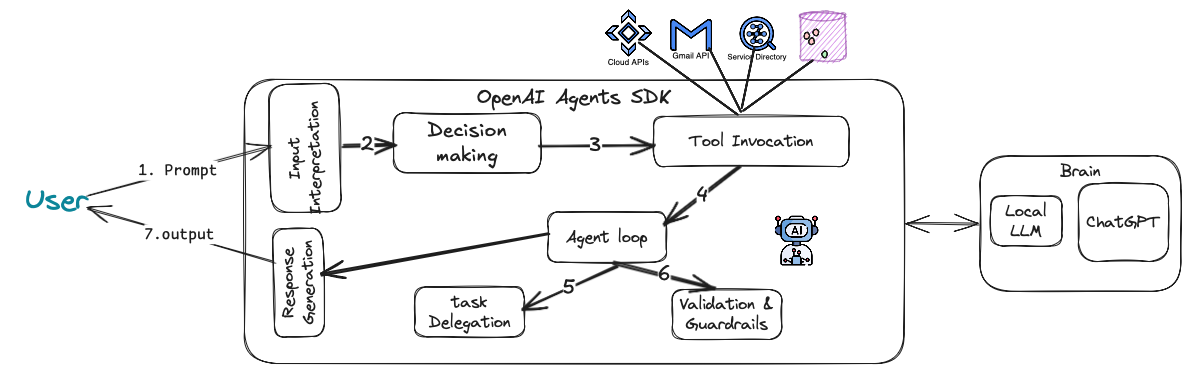
Let's summarize the workflow:
Input: User provides a request.
Agent: Receives and interprets the input.
Tools: Calls external tools (e.g., search, data retrieval).
Agent Loop: Iterates until the task is complete.
Handoff: Delegates tasks to specialized agents if needed.
Guardrails: Ensures input/output compliance.
Output: Delivers the final response to the user.
Having clarified the concept of an agent, let’s now explore a quick example that demonstrates how the Agent SDK operates.
Get started.
First, install Ollama on your local machine. Then, obtain your OpenAI API key to use the SDK.
Step 1. Run your LLM model on Ollama
ollama run qwen2.5:7b # you can use any model like llama3.2If you're having trouble installing Ollama, please refer to my previous post, How to Install Ollama, or check the sample chapter from the book Generative AI with Local LLM.
Note that you need to use an LLM with tool-calling support, such as Llama or Qwen. Models like deepseek-r1 do not support tool-calling functionality, so you will likely encounter 400 HTTP errors whenever using this model without tool support.By default, the SDK looks for the OPENAI_API_KEY environment variable for LLM requests and tracing, so add it by the following command:
export OPENAI_API_KEY="YOUR API KEY GOES HERE"Step 2. Active your conda environment:
conda activate YOUR_ENV
jupyter notebook # assume that, you already have the jupyter installed on conda
We will use the content generation example from CrewAI in our book and modify it to work with the OpenAI Agent SDK. The entire Python notebook is available here.
Example Use Case:
In our weekly routine, we plan to publish a blog post on how to install and deploy
Apache Ignite, an in-memory database, on Docker and Kubernetes. Our goal is to
provide a detailed, step-by-step tutorial to guide our audience through the process.
To save time, we decided to use OpenAI Agent SDK to generate an outline and a draft of the blog post, which we will later edit and refine.
Step 3. To get started, open a new notebook and install the necessary packages. Here's how you can do it:
!pip install -U openai-agents duckduckgo-searchNote that, to get started with the OpenAI Agents SDK, we only need a single unified Python library: openai-agents
Step 4. Import libraries.
from agents import Agent, Runner, OpenAIChatCompletionsModel, AsyncOpenAI, OpenAIChatCompletionsModel, function_tool
from duckduckgo_search import DDGS
Optional package and libraries.
!pip install nest-asyncio
import nest_asyncio
nest_asyncio.apply()
For running the OpenAI SDK on Jupyter Notebook or Google Colab, you need to import the package as shown above. This will prevent errors like: RuntimeError: This event loop is already running.
Step 5. Configure the LLM.
model = OpenAIChatCompletionsModel(
    model="qwen2.5:7b",
    openai_client=AsyncOpenAI(base_url="http://localhost:11434/v1")
)
Change the host and port according to your Ollama configuration.
Step 6. Using a Function calling.
To integrate DuckDuckGo search with the OpenAI Agent SDK, we need to use the Function Calling feature. This will allow us to fetch up to 5 news articles related to a given topic.
@function_tool
def get_news_articles(topic):
    print(f"Running DuckDuckGo news search for {topic}...")

    # DuckDuckGo search
    ddg_api = DDGS()
    results = ddg_api.text(f"{topic} ", max_results=5)
    if results:
        news_results = "\n\n".join([f"Title: {result['title']}\nURL: {result['href']}\nDescription: {result['body']}" for result in results])
        print(news_results)
        return news_results
    else:
        return f"Could not find news results for {topic}."
Here,
@function_toolis a decorator provided by the OpenAI Agent SDK. It registers theget_news_articlesfunction as a callable tool that can be accessed by the agent.get_news_articles(topic)is a function that takes atopicas input and retrieves related news articles.
What is happing under the hood:
This function integrates DuckDuckGo search with the OpenAI Agent SDK.
It fetches up to 5 news articles related to a given topic.
Results are returned in a human-readable format or an error message if no articles are found.
Step 7. Create the content_planner_agent.
The agent will define with a Name, instruction and tools that will use to fetch the related articles..
content_planner_agent = Agent(
    name="Content Planner",
    instructions="You are tasked with planning an engaging and informative blog post on {topic}. Your goal is to gather accurate, up-to-date information and structure the content",
    tools=[get_news_articles],
    model=model
)
Here,
The content_planner_agent is an OpenAI Agent that:
Plans blog posts on a given topic.
Fetches up-to-date news using the
get_news_articlestool.Generates a structured outline using the specified language model.
Step 8. Create the writer_agent.
writer_agent = Agent(
    name="Technical content writer",
    instructions="You are the technical content writer assigned to create a detailed and factually accurate blog post on: {topic}",
    model=model
)
This above code defines an AI agent called writer_agent, which:
Produces technical blog posts with a focus on detail and accuracy.
Uses the OpenAI model to generate outputs.
Accepts a topic dynamically via the
{topic}placeholder.
Step 9. Putting it all together, Agents workflow.
# Agent workflow
def openai_agent_workflow(topic):
    print("Running Agent workflow...")

    # Step 1: Search and fetch articles by the content_planner_agent agent
    content_planner_response = Runner.run_sync(
        content_planner_agent,
        f"Get me the articles about {topic} "
    )

    # Access the content from Run Result object
    raw_articles = content_planner_response.final_output

    # Step 2: Pass articles to editor for final review
    edited_news_response = Runner.run_sync(
        writer_agent,
        raw_articles
    )

    # Access the content from RunResult object
    edited_article = edited_news_response.final_output

    print("Final article:")
    print(edited_article)

    return edited_article
topic = "Step by step example of installing Apache Ignite v3 on Docker."
print(openai_agent_workflow(topic))The openai_agent_workflow function orchestrates the collaboration between multiple OpenAI agents to:
Fetch articles using the
content_planner_agent.Refine the content using the
writer_agent.Deliver a final, polished article.
How the Workflow functions together:
Content Collection:
The content_planner_agent gathers real-time articles using DuckDuckGo.
Editing & Refinement:
The writer_agent takes the raw content and crafts a detailed, coherent, and technically accurate blog post.
Output:
The final blog post is printed and returned.
If everything goes as expected, you should get a result similar to the one shown below:
..... trim for saving spaces
Title: Installing Using DEP and RPM Package | Ignite Documentation
URL: https://ignite.apache.org/docs/latest/installation/deb-rpm
Description: If running on Windows 10 WSL or Docker, you should start Apache Ignite as a stand-alone process (not as a service). To start an Ignite node with a custom configuration, run the following command: sudo systemctl start apache-ignite@
Final article:
### How to Install Apache Ignite v3 on Docker: A Comprehensive Guide

Apache Ignite is an in-memory computing platform for enterprise-level applications. This blog post will guide you through the process of installing Apache Ignite version 3 using Docker. We'll cover the necessary steps and configurations to get your Apache Ignite cluster up and running.

#### Step-by-Step Installation Guide Using Docker

1. **Ensure Docker is Installed**
   Before proceeding, make sure Docker is installed on your machine. You can download Docker from the [official website](https://www.docker.com/).

2. **Pull the Apache Ignite Docker Image**
   Open a terminal and run the following command to pull the latest version of the Apache Ignite Docker image:
   ```sh
   docker pull apacheignite/ignite

..... trim for saving spaces
Step 10. Tracing.
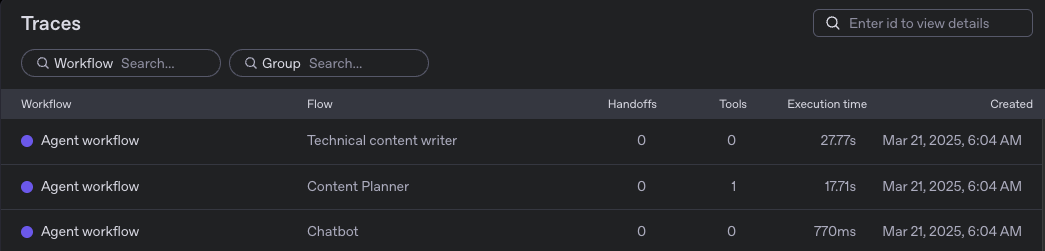
The Agents SDK automatically traces agent runs, making it easy to track and debug the behavior of your agents. You can access the tracing information via the OpenAI Dashboard.
Enhancements that you could add here:
Error Handling: Manage cases where no articles are found.
Multi-Agent orchestration: Add an editor agent for grammar and tone improvements.
Parallel Execution: Use
asyncwithRunner.run()for faster orchestration.
For example, you can add the following Agent and asynchronous agent orchestrations as shown below:
# An editor agent for grammar and tone improvements.
editor_agent = Agent(
    name="Editor Agent",
    instructions="Proofread the given blog post for grammatical errors and alignment with human language for better readability while maintaining its original meaning.",
    handoffs=[content_planner_agent, writer_agent]
)

# Agent orchestration
async def main():
    result = await Runner.run(editor_agent, topic)
    print(result.final_output)
In summary, while both the OpenAI SDK and CrewAI support multi-agent systems, each has distinct advantages suited for different use cases.
CrewAI offers a more structured, role-based collaboration model. It allows you to explicitly define tasks for agents and assign roles, which is ideal for complex workflows that require clear division of responsibilities. This makes it particularly useful for enterprise-level applications or scenarios that involve multiple agents working on different aspects of a problem.
On the other hand, OpenAI's SDK provides a more streamlined and lightweight approach, focusing on ease of integration and scalability. With native OpenAI tool integration, it simplifies the setup process, making it suitable for developers who need a quick and flexible solution for tasks such as natural language processing, content generation, or automated workflows. The OpenAI SDK excels in scenarios where you need to leverage OpenAI's powerful models with minimal overhead, allowing for faster prototyping and deployment.
Overall, the choice between CrewAI and OpenAI SDK depends on your project's complexity and needs. If you require fine-grained control over task delegation and agent collaboration, CrewAI may be the better choice. However, if you're looking for a simpler, more efficient way to integrate OpenAI models into your system, the OpenAI SDK provides a more convenient and scalable option.
If you enjoy reading the blog and find my content helpful or inspiring, consider buying me a coffee on Ko-fi. Your support helps me keep creating, writing, and sharing valuable content for free. Every little bit means a lot — thank you! 💙