A first glance of the PayPal Junodb key-value store
JunoDB is a key-value store, open-sourced by PayPal. As PayPal described, JundoDB offers security, consistency and high availability with very low latency. After reading a few materials (documentation) about JunoDB, I have figured out the following features of the database:
A pure distributed key-value data store written on GoLang based on RocksDB. Data can be stored in memory or on disk.
Proxy-based architecture, where a proxy encapsulates all the complexity of connecting to the storage servers and provides horizontal scaling.
CPU intensive rather than memory-intensive, like Redis or Apache Ignite.
Data entry might have TTL (time-to-live), which can be used to erase data automatically.
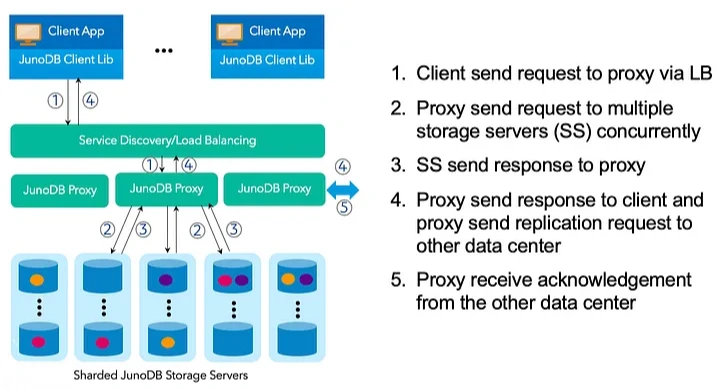
A high-level architecture of the JunoDB is shown below.

The main components of the JunoDB is as follows:
JunoDB client library. Provides APIs (synchronous, a-synchronous and reactive) for DML operations on the data store. APIs are implemented on different programming languages, such as Java, Golang or Ruby.
Load balancing. To prevent the JunoDb proxy from being a single point of failure, load balancers act as an upstreamer between the client and the JunoDB proxy. The load balancer receives an incoming request from the client application and routes the request to the appropriate proxy instance.
JunoDB proxy. Handles the job of redirecting the request to the correct JunoDB storage server. The JunoDB proxy uses ETCD for storing the shared mapping cluster configuration.
Storage servers. Grounded on RocksDB for storing data in-memory or persistence storage. Uses Raft consensus algorithm to synchronise data between storage servers. Each storage server is responsible for a set of shards.
For further reading, please check the reference part of the post.
So, the CPU-intensive and proxy-based architecture are interesting to me, and I decided to give it a try. In the rest of the post, I will describe how to install JunoDB and develop a simple Java application to do some DML operations on it.
What I am going to use:
Ubuntu 20 LTS as a virtual machine
Docker engine 25.0.3
JunoDB
Java 17 for developing client application.
Note that, before starting, make sure that you have already installed MAKE on your Ubuntu.
sudo apt-get update

sudo apt-get -y install make
Step 1: Clone the JunoDB repository from Github.
Step 2: Setup JunoDB home directory
export BUILDTOP=<path_to_junodb_folder>/junodb
cd $BUILDTOP
Step 3: Build JunoDB.
docker/build.shThe above command will take a few minutes to build docker images. After a successful build, you should have the following Docker images in your Docker local repository as shown below:

Step 4: Run JunoDB.
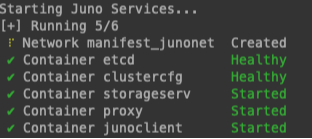
docker/start.sh Docker will start appropriate containers for the JunoDB instance.

After a while, you should have up and running the following Docker containers.

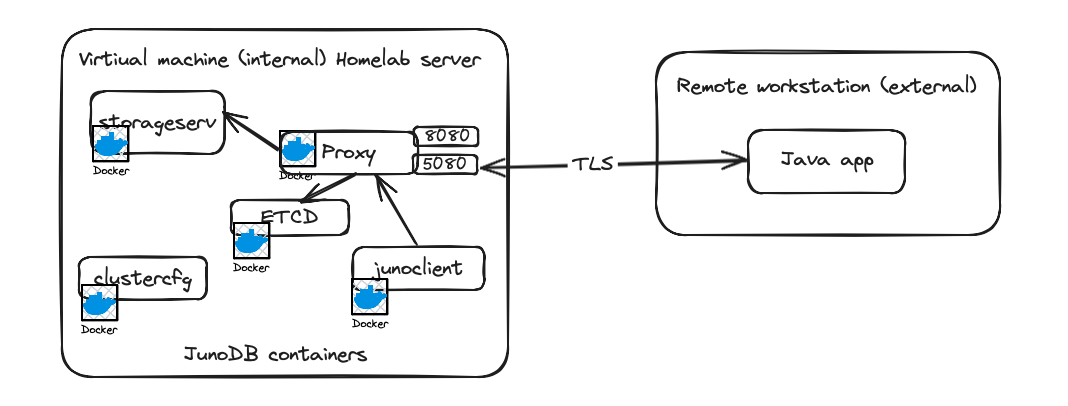
JunoDB proxy will be available on ports 5080 (TLS) and 8080 (TCP). It will be the entry point for the client application.
Alternatively, you can use Docker Compose to run the JunoDB instance.
cd $BUILDTOP/docker/manifest
docker compose up -d
Step 5: Validate the JunoDB installation.
docker exec -it junoclient bash -c 'nc -vz proxy 5080'It will return very similar output, as shown below.
Connection to proxy 5080 port [tcp/*] succeeded!Step 6: Smoke test of the installation. Add some entries through the JunoClient.
docker exec -it junoclient bash -c '/opt/juno/junocli create -s proxy:8080 -c config.toml -ns test_ns test_key test_value'If everything goes fine, you should get the following output on the terminal:
* command 'create' successful
RecordInfo {
  version     : 1
  creationTime: 1715872940
  timeToLive  : 1800
  originatorID: 168c4c51-1398-11ef-97cd-0242ac140006
}
Moreover, you can retrieve the data by using the following command:
docker exec -it junoclient bash -c '/opt/juno/junocli get -s proxy:8080 -c config.toml -ns test_ns test_key'For now, the JunoDB instance is up and running. Let's develop a very basic Java application to store and retrieve data into JunoDB. My server configuration will be very similar to the following diagram.

Step 7: Clone the repository from GitHub.
The project is a simple spring-boot standalone application, that uses the JunoDB client API to store and retrieve entries on JunoDB.
Step 8: Change the JunoDB server host and port in the application properties files.
juno.server.host=192.168.1.124
juno.server.port=5080
Note that, 5080 is a TLS port. If you want to use the tcp port, use 8080.
Another important properties is "juno.useSSL". In my case, I am going to use SSL.
Step 9: Generating Secrets.
For the TLS/SSL Handshake with the JunoDB Server, we need to have the Private Keys of the System for the Client to use. Run the gensecrets.sh file located on the ${project.basedir}/src/main/resources/secrets folder.
chmod u+x gensecrets.sh
./gensecrets.sh
Step 10: Build the project.
From the root directory of the project, run the following maven command:
mvn clean installStep 11: Copy the generated secrets into the target directory.
Copy the ${project.basedir}/src/main/resources folder to ${project.basedir}/target folder.

Step 12: Run the application.
From the target directory, execute the following command:
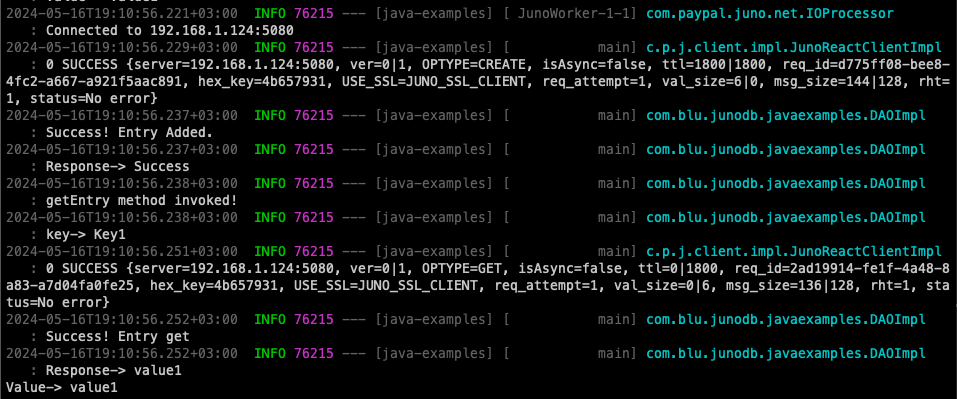
java -cp 'java-examples-0.0.1-SNAPSHOT-jar-with-dependencies.jar:resources/' com.blu.junodb.javaexamples.JavaExamplesApplicationThe client application will connect to the server and add/retrieve one entry.

That's all for now. Next, I will try to figure out how to monitor and manage the JunoDB cluster.
References: