Building Spring Boot application native image with GraalVM 21
After a long period of time, it's my first blog post. In this blog post I am going to look at the spring native 0.8.5 release for building Spring Boot application with GraalVM 21.0 version. Specially, I am going to explore the Spring native for GraalVM feature for compiling Spring applications to native executables using the native-image compiler.
Native Image is a technology to ahead-of-time compile Java code to a standalone executable, called a native image. This executable includes the application classes, classes from its dependencies, runtime library classes, and statically linked native code from JDK. It does not run on the Java VM, but includes necessary components like memory management, thread scheduling, and so on from a different runtime system, called “Substrate VM”.
So, we are going to do the following:
Build a simple cloud-native application based on Spring Boot.
Next, we will produce a Native image by using native-image-maven-plugin
Run the native image
The entire project will be highly depends on the following dependencies:
Spring Boot 2.4.2. baseline
GraalVM 21.0.0
GraalVM native image maven plugin
Let's get our hands dirty. As my reader already knows, I am always trying to write blog post that are 100% comprehensible and therefore you can find the example project on GitHub.
Step 1. Build a basic Microservice named getQuotes.
Get started quickly with Spring Boot by creating a new project that uses the Spring Initializr. Use the following project metadata to generate a Maven project with all the necessary dependencies.
Group: com.blu.std
Artifact: springboot-hello-world
Download the project and unarchive it somewhere in your file system. Alternatively, you can download the complete project from the GitHub repository and start modifying it.
Add a Web controller into the project. Probably, you have seen this kind of code a thousands times, so I won't explain the code line by lines. Anyway, if you got trouble with the code, and need some explanation, please visit my previous post for more details.
import java.util.Random;

@RestController
@Configuration
@PropertySource("classpath:app.properties")
public class DemoController {

    private static final Logger LOGGER = LoggerFactory.getLogger(DemoController.class);

    @Value( "${spring.hello-world.quotes}" )
    private String suffix_quote;

    /**
     * curl -w "\n" http://localhost:8080
     * **/
    @RequestMapping("/")
    public String index() {
        return "Spring Boot Hello-world application for demo!";
    }

    /**
     * curl -w "\n" http://localhost:8080/getQuote
     * **/
    @RequestMapping("/getQuote")
    public String getQuote() {
        LOGGER.info("/getQuote method invoked!");

        final String[] todaysQuote = new String[]{
                "Today you are you!",
                "Today is good.",
                "Today is the only day.",
                "What is not started today is never finished tomorrow."
        };
        final int rnd = new Random().nextInt(todaysQuote.length);

        return suffix_quote + " : " + todaysQuote[rnd];
    }

}
Step 2. Build and test the Spring Boot application.
To build the project, run the following command from your favourite terminal.
mvn clean installAt this point, the project is ready to run. Execute the following command from the project home directory.
mvn spring-boot:runYou should see output similar to the following:
19:18:45.930 [main] INFO com.blu.std.App - Spring Boot Hello-World app runs!

  .   ____          _            __ _ _
 /\\ / ___'_ __ _ _(_)_ __  __ _ \ \ \ \
( ( )\___ | '_ | '_| | '_ \/ _` | \ \ \ \
 \\/  ___)| |_)| | | | | || (_| |  ) ) ) )
  '  |____| .__|_| |_|_| |_\__, | / / / /
 =========|_|==============|___/=/_/_/_/
 :: Spring Boot ::                (v2.4.2)

2021-02-08 19:18:46.584  INFO 91946 --- [           main] com.blu.std.App                          : Starting App using Java 11.0.10 on shamim-2.local with PID 91946 (/Users/shamim/Development/workshop/github/Microservices-nutsAndbolts/CloudNative-application/springboot-hello-world/target/classes started by shamim in /Users/shamim/Development/workshop/github/Microservices-nutsAndbolts/CloudNative-application/springboot-hello-world)
2021-02-08 19:18:46.585  INFO 91946 --- [           main] com.blu.std.App                          : No active profile set, falling back to default profiles: default
2021-02-08 19:18:47.570  INFO 91946 --- [           main] o.s.b.w.embedded.tomcat.TomcatWebServer  : Tomcat initialized with port(s): 8080 (http)
2021-02-08 19:18:47.579  INFO 91946 --- [           main] o.apache.catalina.core.StandardService   : Starting service [Tomcat]
2021-02-08 19:18:47.580  INFO 91946 --- [           main] org.apache.catalina.core.StandardEngine  : Starting Servlet engine: [Apache Tomcat/9.0.41]
2021-02-08 19:18:47.640  INFO 91946 --- [           main] o.a.c.c.C.[Tomcat].[localhost].[/]       : Initializing Spring embedded WebApplicationContext
2021-02-08 19:18:47.640  INFO 91946 --- [           main] w.s.c.ServletWebServerApplicationContext : Root WebApplicationContext: initialization completed in 1007 ms
2021-02-08 19:18:47.879  INFO 91946 --- [           main] o.s.s.concurrent.ThreadPoolTaskExecutor  : Initializing ExecutorService 'applicationTaskExecutor'
2021-02-08 19:18:48.061  INFO 91946 --- [           main] o.s.b.a.e.web.EndpointLinksResolver      : Exposing 2 endpoint(s) beneath base path '/actuator'
2021-02-08 19:18:48.110  INFO 91946 --- [           main] o.s.b.w.embedded.tomcat.TomcatWebServer  : Tomcat started on port(s): 8080 (http) with context path ''
2021-02-08 19:18:48.125  INFO 91946 --- [           main] com.blu.std.App                          : Started App in 2.093 seconds (JVM running for 2.393)
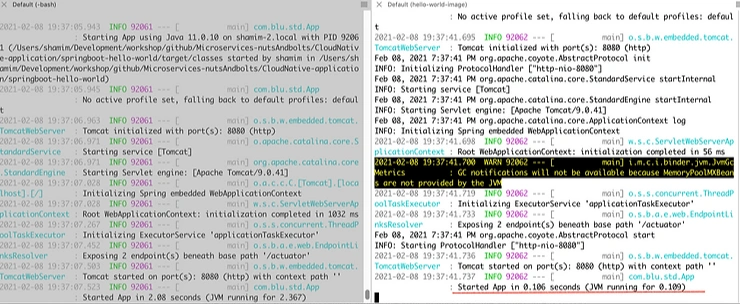
Note that, the application start time is 2.09 s.
Open another terminal and run the following URL. Alternatively, you can open a web browser to http://localhost:8080/getQuote.
curl http://localhost:8080/getQuote ;echoYou should see the following output:
What is not started today is never finished tomorrow.Step 3. Download and install GraalVM
Now that our application is up and running, it's time for creating a Native image of the application. The native image will contain the application code, required libraries, and a reduced version of VM for running the application. This image will reduce the application bootstrap time and minimize the memory footprint.
As we mentioned before, we need GraalVM to produce a Native image of the application. Download the GraalVM distribution from the Github. I am using community version 21.0.0 for macOS darwin.
Unarchive the GraalVM distribution somewhere in your file system and set the GRAALVM_HOME environmental variable to the GraalVM installation directory. For macOS, point the variable to the Home sub-directory as follows:
export GRAALVM_HOME=$HOME/Development/graalvm/Contents/Home/Optionally, you may need to install Xcode if you didn't it before. Now install the native-image tool using gu install. Run the following command:
${GRAALVM_HOME}/bin/gu install native-imageStep 4. Create a Spring boot application native image.
Now that, you have the GraalVM installed and configured, it's time to create our native image.
Add the following maven dependency.
 <dependency>
    <groupId>org.springframework.experimental</groupId>
    <artifactId>spring-graalvm-native</artifactId>
    <version>0.8.5</version>
</dependency>
Add a maven repository and plugin repository, because spring-graalvm-native plugin is only available from the Spring Milestones repositories.
<repositories>
    <repository>
        <id>spring-milestones</id>
        <name>Spring Milestones</name>
        <url>https://repo.spring.io/milestone</url>
    </repository>
</repositories>
<pluginRepositories>
    <pluginRepository>
        <id>spring-milestones</id>
        <name>Spring Milestones</name>
        <url>https://repo.spring.io/milestone</url>
    </pluginRepository>
</pluginRepositories>
Finally, add a maven profile section into the project POM file as follows:
<profiles>
    <profile>
        <id>graal</id>
        <build>
            <plugins>
                <plugin>
                    <groupId>org.graalvm.nativeimage</groupId>
                    <artifactId>native-image-maven-plugin</artifactId>
                    <version>${graalvm.version}</version>
                    <configuration>
                        <skip>false</skip>
                        <imageName>hello-world-image</imageName>
                        <mainClass>com.blu.std.App</mainClass>
                        <buildArgs>
                            --no-fallback
                        </buildArgs>
                    </configuration>
                    <executions>
                        <execution>
                            <goals>
                                <goal>native-image</goal>
                            </goals>
                            <phase>package</phase>
                        </execution>
                    </executions>
                </plugin>
                <plugin>
                    <groupId>org.springframework.boot</groupId>
                    <artifactId>spring-boot-maven-plugin</artifactId>
                </plugin>
            </plugins>
        </build>
    </profile>
</profiles>
In the configuration section, we defined com.blu.std.App as a main class and hello-world-image as an Image name.
Stop the application by entering Crtl+C command, and execute the following command:
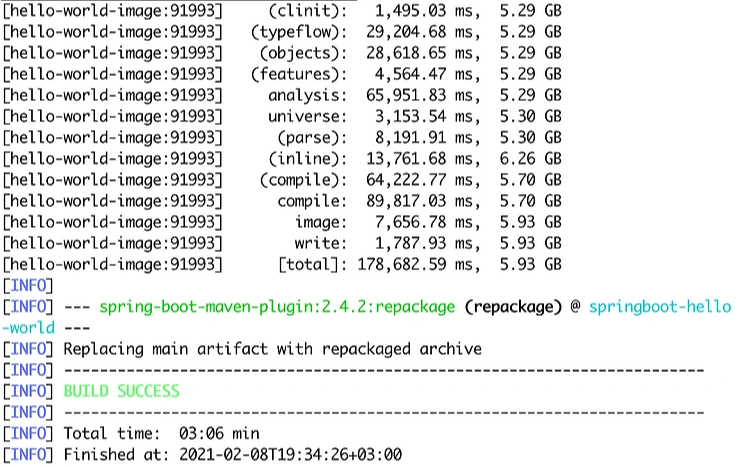
mvn -Pgraal clean packageThe command will execute the package phase of the graal profile and takes a few minutes to complete (for me, it takes more than 3 minutes).

The above command will also produce /target/hello-world-image image file, which is bigger than regular JAR file (in my cases, its 72,3 Mb). Now, you can run the native image by executing the following command from the project home directory:
./target/hello-world-imageThe application should start almost instantaneously. In my cases, the startup time is 0.106 seconds.

To test the service, create a REST request on the service route's /quotes/todays endpoint.
shamim-2:~ shamim$ curl -w "\n" http://localhost:8080/getQuote
Today is good.
Summary
In this blog post, we learned how to build a basic Spring Boot application and creates a native image through GraalVM. We configured the entire project declaratively through GraalVM native-image-maven-plugin.
Homework.
None ))